
Modules
Boards
Boards organize work as lists of cards you drag from one column to the next. Each card can carry dates, labels, assignees, dependencies and your own custom fields, and the same board can be viewed as a timeline.
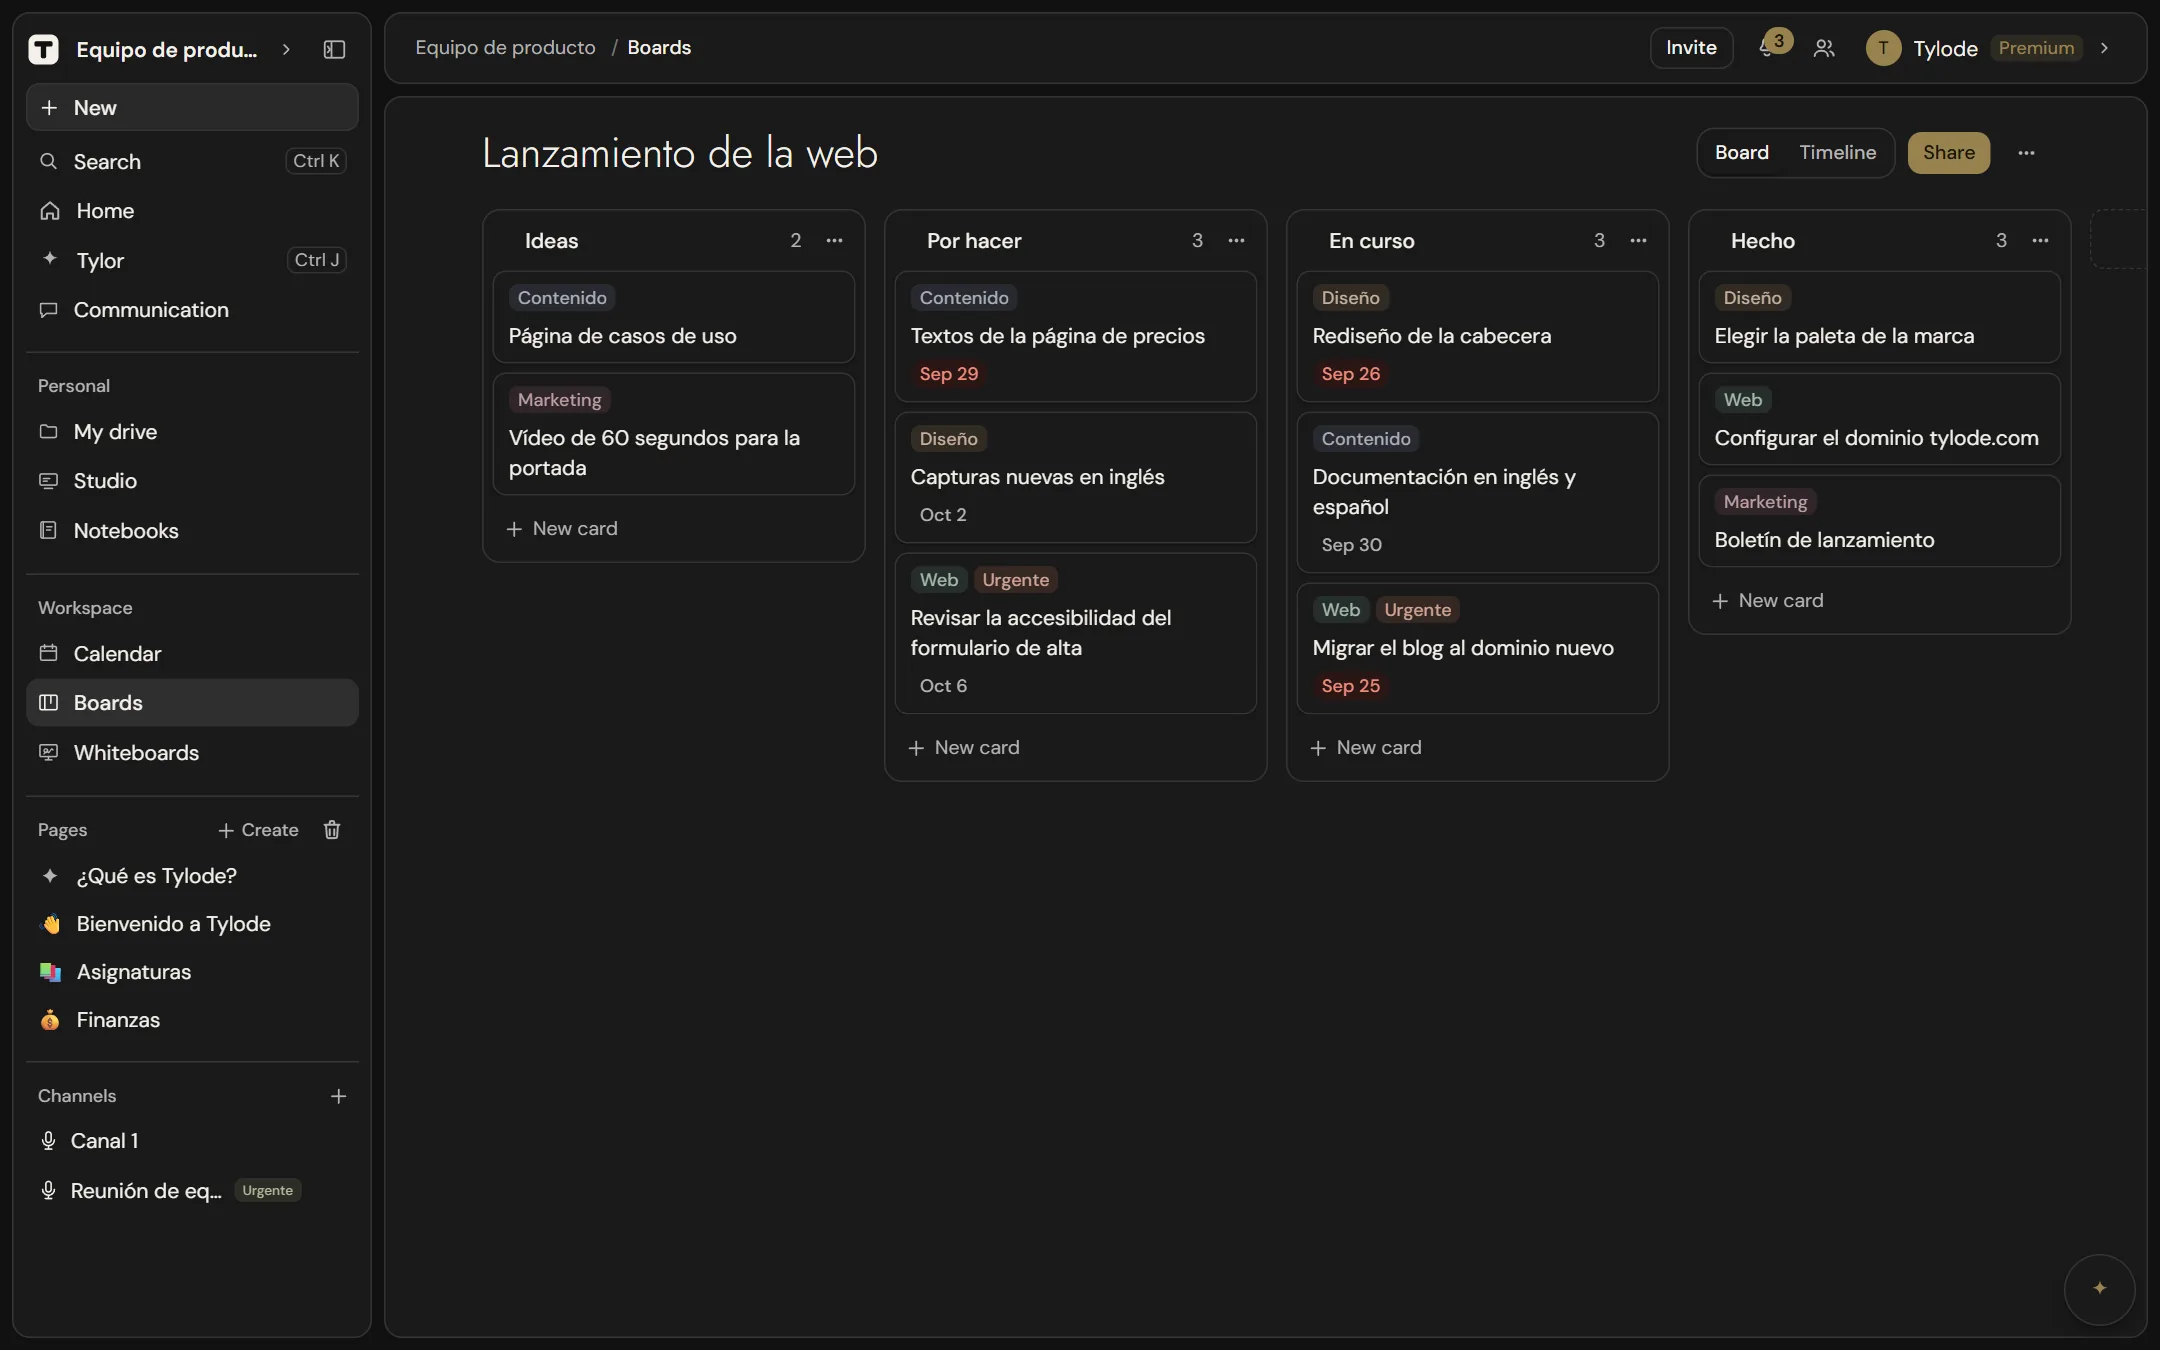
Where to find boards
Open Boards in the Workspace group of the sidebar. You'll see every board in the current workspace that you have access to. Boards belong to the workspace, so everyone with access sees the same lists and cards.
Each board is a card with a thumbnail of its lists and cards, its name and a line such as "3 lists · 12 cards". Click a card to open the board. If there are no boards yet, the page says No boards yet and shows a New board button.
Create, rename and delete boards
Create a board
- Go to Boards.
- Click New board.
The new board opens straight away with one list, ready for your first cards. The Board button on Home also takes you to Boards, and you can create a board from inside a page with the / menu (see Embed a board in a page).
Rename a board
- From the board: open it, click its name at the top and type the new name. Changes save as you type.
- From the Boards list: click ⋯ on the board's card and choose Rename. Type the new name and press Enter or click outside to save; Esc cancels.
Clicking a board's card in the list always opens it; it doesn't start renaming.
Delete a board
- In Boards, click ⋯ on the board's card and choose Delete board.
- Confirm in the dialog. The board goes to the trash with all its lists, cards and automations.
From the trash you can restore it as it was or delete it forever. Only the person who created it and the workspace admins can delete or restore it.
Lists
Lists are the columns of the board. Each list is only as tall as its cards, and its header shows the list name, the number of cards in it and a ⋯ menu.
| Action | How |
|---|---|
| Create a list | Click New list to the right of the last list. |
| Rename a list | Click the list name and type. |
| Reorder lists | Hover over the list and drag it by the grip icon that appears to the left of its name. On touch screens the grip is always visible. |
| Delete a list | Click ⋯ in the list header and choose Delete list, then confirm. The dialog tells you how many cards will be deleted with it. If it was a mistake, undo it. |
On a phone
On narrow screens, a board shows one list at a time, full width. Swipe sideways to move to the next one, or tap its name in the row of lists at the top, which shows each list with its number of cards. On a computer, and in boards embedded in a page, lists sit side by side as usual.
Colors
Boards, lists and cards use the eight tones in the palette: apricot, pistachio, sky, wheat, peony, mint, coral and lavender.
- Board color: click the colored dot next to the board's name, or choose Board color in the ⋯ menu of the board or of its card in Boards. It shows in the board list and next to the board's name. If you don't pick one, each board has a fixed one.
- List color: click the colored dot next to the list's name, or choose Column color in its ⋯ menu. On Automatic, the color comes from the name ("To do", wheat; "Doing", sky; "Review", lavender; "Blocked", coral; "Done", pistachio) or, if nothing matches, from its position.
- Card color: in the card editor, pick a tone under Card color. It shows as a thin stripe at the top of the card; with No color, there's no stripe.
Cards
Create a card
Click New card, right under the last card of a list. The card is added at the end of the list with the title "Untitled" and opens straight away in the editor so you can fill it in.
You can also ask the assistant to create a card, for example "card Send the invoice in Marketing". It adds the card at the end of the first list of the board you name (or of the first board, if you don't name one).
Move cards
Drag a card to reorder it within its list or drop it into another list. Moving a card to another list is what triggers automations and the card.moved webhook.
What a card shows on the board
Each card on the board shows:
- a thin stripe of its color at the top, if it has one,
- its labels, each with its name and color,
- its title,
- its due date, if it has one, as a small badge that turns red when the card is overdue,
- an amber Blocked badge if it depends on other cards (hover to see how many),
- how many items of its checklist are done, like 2/5 (green when they all are).
Read view and editor
Click a card to open its read view, which shows all its fields without risk of changing anything. Click Edit to open the editor, change what you need and click Save. Cancel or Esc closes the editor without saving.
To delete a card, open the editor, click Delete and then click again (Sure? Click again).
Card fields
| Field | What it does |
|---|---|
| Title | The card's name. |
| Description (optional) | Free text with more detail. |
| Start and Due date | Dates for planning (see below). |
| Card color | A colored stripe at the top of the card (see Colors). |
| Labels | The board's labels, with one click, plus an optional custom one just for that card. |
| Assignees | Workspace members responsible for the card. |
| Blocked by | Other cards on the board that must be done first. |
| Custom fields | Extra fields you define for the whole board. |
Dates and milestones
A card can have a Start date, a Due date, both or neither. The start can't be later than the due date.
- With both dates, the card is drawn as a bar on the timeline.
- With only one, it's drawn as a milestone (a single-day marker).
- The due date appears on the card face and feeds Home.
Labels
Each board has its own list of labels, each with a fixed name and color. Manage it with the Labels button in the board header (or Manage labels while editing a card): add a label by typing its name and picking one of eight warm colors (clay, olive, slate, ochre, plum, sage, terracotta or stone), click a label's color dot to change it, rename it in place or delete it with the trash icon. Changes show on every card that has the label, and a deleted label disappears from all of them. A board can't have two labels with the same name.
While editing a card, click the board's labels to add or remove them. To note something on that card only, type it in Custom label and press Enter: it shows with an outline, no color, and isn't added to the board's list.
Assignees
Click workspace members under Assignees to assign or unassign them. You can assign several people to one card. When someone else assigns you, you get a notification.
Checklist
Each card can have a list of steps. In the editor, type an item in Add an item… and press Enter; repeat for the rest. You can rewrite each item or remove it with the bin. It's saved with Save.
To tick an item off you don't need the editor: open the card and tick its box in the read view, and it's saved right away. The board shows on each card how many are done, like 2/5. Up to 100 items per card.
"Blocked by" dependencies
Under Blocked by, click the other cards on the same board that this card depends on. A card with dependencies shows a Blocked badge on the board, and on the timeline an arrow is drawn from each blocking card to the card it blocks.
Custom fields
Custom fields add your own properties to every card on the board.
- In the card editor, under Custom fields, click Add. A new field called "Field" is created for all cards on this board.
- Type the field's name.
- Pick its type from the dropdown.
- Fill in the value for this card.
To remove a field from the whole board, click Delete field next to it. Its values are removed from every card.
| Type | Value |
|---|---|
| Text | Free text. |
| Number | A number. |
| Select | One option from a list. Add options with New option; each gets one of the same eight warm colors as labels. |
| Date | A calendar date. |
| Checkbox | Yes or no. |
| Person | A workspace member. |
| Image | An uploaded image. |
| Audio | An uploaded audio file. |
| Document | Any other allowed file (PDF, Office documents, ZIP…). |
Attachments on cards
Cards don't have a general attachments area. To attach files, add a custom field of type Image, Audio or Document and use Upload file in the card editor. Remove file takes it off the card.
Uploaded files count toward the workspace's storage, and each file can be up to 5 GB on every plan. The allowed file types are the same as in My drive.
Timeline view
Switch between Board and Timeline with the segmented control at the top of the board, next to the Access and Automations buttons. The timeline is a Gantt chart of the cards that have dates, grouped by list.
| Control | What it does |
|---|---|
| Days / Weeks / Months | Changes the zoom level. |
| Today | Scrolls back to today. |
| Drag a bar | Moves the card in time, keeping its duration. |
| Drag a bar's left or right edge | Changes its start or due date. Milestones can be moved but not resized. |
| Double-click a bar | Opens the card. |
Dependency arrows show which cards block which, and blocked bars are marked as blocked.
Schedule cards without dates
Cards with no dates are listed in the No dates (n) tray below the chart. Click a card to open it, or click Schedule to give it a start date of today and a due date two days from now; you can then drag and resize it as needed.
Automations
Automations assign cards automatically when they reach a list. There is one kind of rule:
When moved to list → assign to member
- Open the board and click Automations.
- Under New rule: when a card is moved to…, pick the list and, under assign to, the member.
- Click Add rule.
When any card is moved into that list, the member is added to its assignees (existing assignees are kept). Delete a rule with the trash icon next to it. A board can have several rules.
Access
By default, everyone in the workspace can see and edit a board. To restrict it, click Access at the top of the board:
- Entire workspace: any member can view and edit it.
- Only people I choose: only the creator, admins and the people or teams on the list. Use Give access to… to add a person or a whole team and choose Can view or Can edit for each. Remove access takes them off.
When a board is restricted, the button reads Restricted. Only the board's creator and workspace admins can change access. Editing also requires your workspace role to allow creating and editing content. See Access to boards, whiteboards and databases.
Undo and redo
Press Ctrl+Z (⌘+Z on Mac) to undo the last change on the board, and Ctrl+Shift+Z or Ctrl+Y to redo it. The arrows next to Share do the same; they appear as soon as you make a change.
Almost everything you do on the board can be undone: moving cards and lists, creating, editing and deleting cards, renaming and deleting lists, changing dates on the timeline and ticking checklist items. Up to 50 steps. The board name, the assignees of a deleted card and other people's changes aren't undone. While you're typing in a field, Ctrl+Z undoes the text, not the board.
Real-time updates
Boards update live for everyone who has them open: new cards, moves, edits and new lists appear without reloading.
Embed boards elsewhere
Embed a board in a page
- In a page, type
/and choose Board. - Pick an existing board under Choose a board to embed here, or click Create new board.
The board appears inside the page in a compact form: you can add and move cards and open them, just like on the board itself. The view switch, Access and Automations are only on the full board. See Blocks.
Embed a board in a whiteboard
On a whiteboard, use Insert a Tylode object and choose Board. The whiteboard shows a card with the board's name and an Open button.
Embed a board in Studio
In a Studio design, open Data on the right-hand rail, click Boards and databases and pick a board. The slide shows the board's lists and cards read live and read-only; it refreshes every time the design is opened. If you export to PowerPoint, the board is converted to a table with the data at the moment of export.
Notifications when someone assigns you
When another person assigns you to a card, either by hand or through an automation, you get a notification in Activity: "{name} assigned you a card". Assigning yourself doesn't notify you. See Notifications.
Due cards on Home
The Home calendar shows cards with a due date from the current workspace's boards, alongside events: each day of the month with something on is marked, and under Coming up the card appears with the board icon. Click it to open its board. In the calendar's ⋯ you choose whether it shows all boards or only some.
Limits by plan
| Free | Pro | Premium | |
|---|---|---|---|
| Boards per workspace | 2 | 5 | Unlimited |
The limit counts boards in each workspace and uses your effective plan (the lower of your plan and the workspace's plan). When you reach it, you'll see a message saying you've reached your plan's limit, with a link to the plans. Existing boards keep working. In a frozen workspace boards are read-only. See Plans.
What boards don't do yet
- No checklists on cards. For a single yes/no item, add a Checkbox custom field. For a real checklist, create a page with a Check List block and embed the board in that same page.
- No comments or activity history on cards. Use the description, or discuss the card in a page or chat.
- No general attachments. Files go through Image, Audio or Document custom fields (see Attachments on cards).
API and webhooks
With a Pro or Premium plan you can read boards and cards and create cards through the REST API (GET /boards, GET /boards/:id/cards, POST /boards/:id/cards) and through the MCP server. Workspace admins can also send card.created and card.moved events to your own URL with webhooks. See Boards API and Webhooks.