Modules
Calendar
Tylode has a single Calendar. It shows the workspace's events, which the whole team sees, and on top of them the events from your personal calendar, which only you can see. Both layers work the same way; the workspace one adds participants and a tool to find a time that suits everyone.
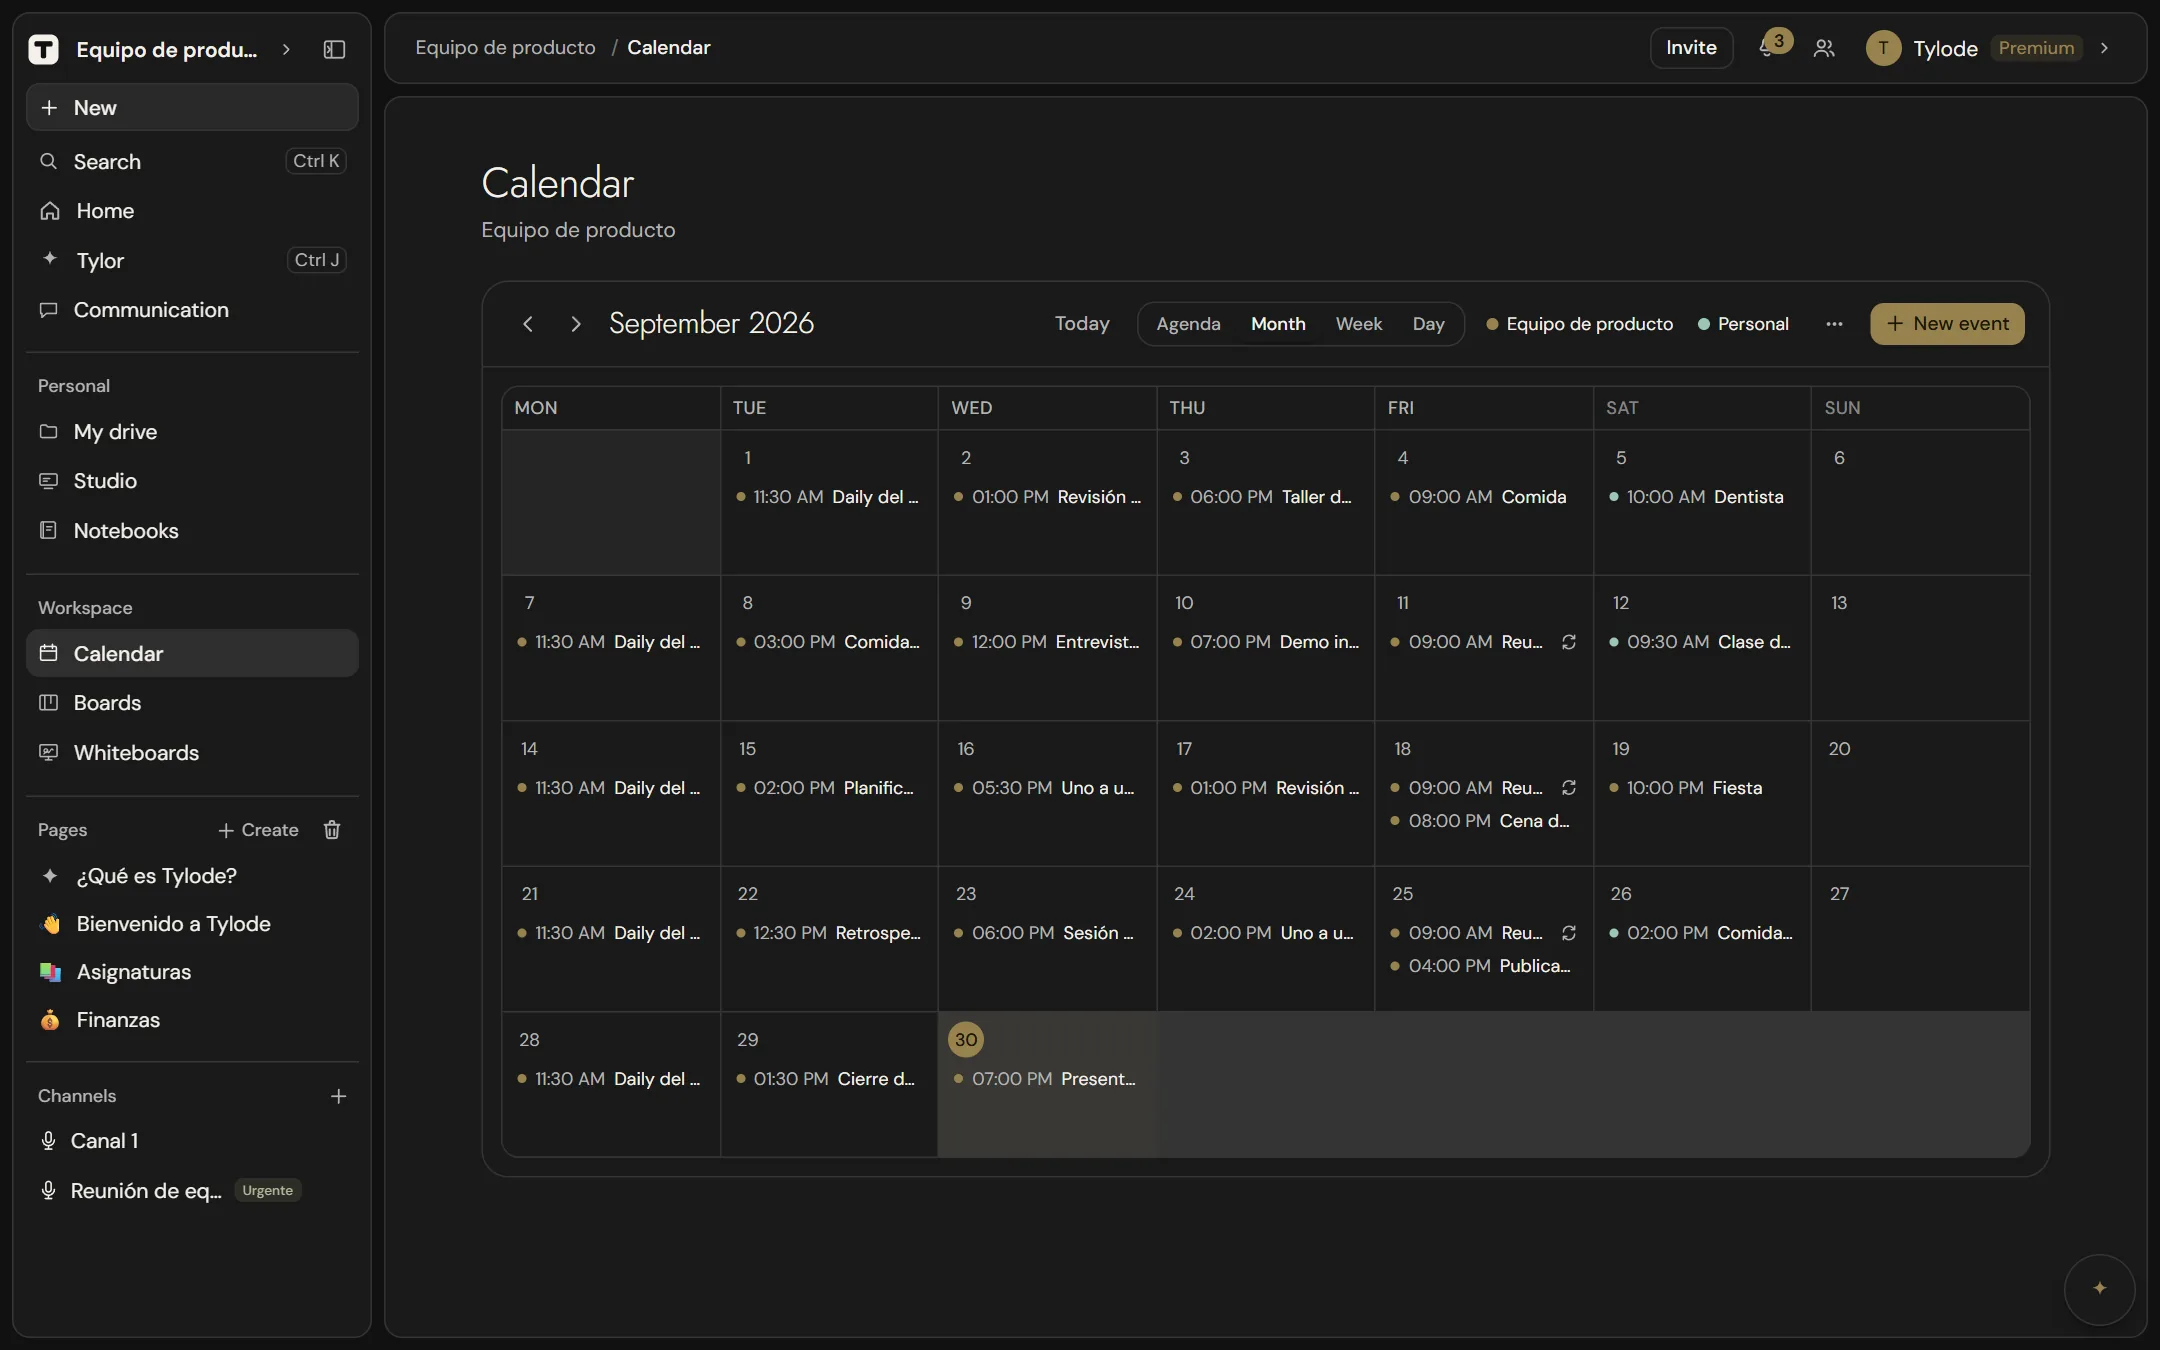
The workspace calendar and your personal layer
Open Calendar in the Workspace group of the sidebar. You'll see two layers at once:
| Workspace layer | Your personal layer | |
|---|---|---|
| Color | The workspace's, unless you pick another | Mint, unless you pick another |
| In the legend | The workspace's name | Personal |
| Who sees it | Everyone in the current workspace | Only you |
| How many | One per workspace | One per account, the same in every workspace |
| Participants | Yes | No |
| Counts in Availability | Yes | No |
| Who can create and edit events | Members whose role allows creating and editing content | Only you |
| Embed in pages and whiteboards | Yes | No |
Only you can see your personal events: other members of the workspace can't, and that includes owners and admins. Use them for appointments you don't want your team to see.
Hide a layer
The legend in the calendar toolbar shows both layers, each with its colored dot. Click one to hide its events (it gets struck through) and click it again to show them. If you leave only your personal layer visible, new events go to it by default. Tylode remembers in that browser which layers you've hidden.
Calendar colors
Each calendar has its color, one of the nine calendar tones (apricot, pistachio, sky, wheat, peony, mint, coral, lavender and Lucía). To change it, open the ⋯ menu in the calendar toolbar, choose Calendar colors and click the tone you want for each layer. Below it you can pick its intensity. It's saved straight away.
A calendar's color is the same for everyone who sees that calendar. If the workspace calendar has no color of its own, it uses the workspace color. Events with their own color use theirs.
If you're not in any workspace
Without a workspace there's no workspace layer: your personal calendar opens on its own, at /dashboard/personal-calendar. If you have a workspace, that address takes you to the Calendar, so old links keep working.
Move around the calendar
The Calendar page has no title: the calendar takes up the full height of the screen.
The left column
On wide screens, there's a column to the left of the calendar with:
- The month you're looking at (or the dates of the week or day), with ‹ and › (Previous and Next) to go back or forward: one month, one week, one day, or 30 days in the Agenda.
- The views: Day, Week, Month and, set apart, Agenda.
- New event, which opens the editor on the date you're looking at (see Create an event).
- Booking links, so people can book you in your free time (see Booking links).
- Habits, reminders that repeat without taking up the calendar (see Habits).
- Back to today, which only appears once you've moved to another date. It takes you back to today without changing the view.
- Templates, your usual events, ready to drag onto a day (see Event templates).
Above the calendar you'll find the title, the layer legend (see Hide a layer) and the ⋯ menu (More calendar options), with:
- View the workspace calendar in Apple or Outlook… and View your personal calendar in Apple or Outlook… (see See it in Apple or Outlook);
- Import .ics (see Import a calendar);
- Booking links (see Booking links);
- Calendar colors (see Calendar colors);
- Availability (see Shared availability).
On narrower screens
Without room for the column, everything goes in the toolbar above the calendar: ‹ and ›, the title, Back to today (when today isn't in view), the Agenda, Month, Week and Day views, the legend, the ⋯ menu and New event, which creates the event today. Templates are only in the column on wide screens.
On a phone, the toolbar fits on one row: ‹, ›, the date and ⋯. The ⋯ sheet has Back to today (if you've moved), the views, the two layers (tap them to hide or show them) and the rest of the menu's options. To create an event, use the + in the bottom tab bar or the + on each day in the Agenda.
Agenda view
Click Agenda to see the next 30 days that have something on as a list, one below the other, with each event's full title. Today always appears, even when it's empty. Each day has its own + to create an event on it, and ‹ and › jump 30 days at a time. If there's nothing, you'll see "Nothing in the next 30 days."
On narrow screens, such as a phone, the calendar opens in the Agenda, because titles don't fit in the month grid. On a computer it opens in the Month view. The other views are one tap away.
Month view
On a computer, the calendar opens in the Month view, which shows the whole month at a glance.
- Today's cell is tinted and its number sits in a circle in your accent color.
- Each event with a color sits in a box of that color; events without a color have no box (see Event colors).
- Timed events show the start time and the title. All-day events go above the timed ones.
- The colored dots next to the title are its tags, and recurring events show a small repeat icon.
- Each day shows up to three events. If there are more, you'll see a link such as +2 more: click it to open the Week view on that week, where they all fit.
- Click an event to open it.
Week view
Click Week to see seven columns, from Monday to Sunday. It's the view to use when a day is busy.
- Each day shows all its events, with no limit: the full title on top, however long it is, and the time below. All-day events come first.
- Days without events say "No events".
- Today's column is tinted and its number sits in a colored circle, as in the month.
- ‹ and › move one week at a time.
- To add an event on a particular day, hover over it and click +. On touch screens the + is always visible.
On narrow screens, such as a phone, the days are stacked one below the other instead of side by side.
Day view
Click Day to see all 24 hours of a day in half-hour slots, with the time on the left.
- Each event fills its slot, from when it starts to when it ends. If two overlap, they share the width.
- All-day events go at the top, in their own band.
- On today, a red line marks the current time and the view opens an hour before now. Any other day opens at 8:00.
- Click a free slot to create an event starting at that time and lasting an hour.
- ‹ and › move one day at a time.
Create an event
- Click New event, or hover over a day and click the + that appears to create it on that day. On touch screens the + is always visible. You can also use New → Event at the top of the sidebar.
- Under Where it goes, choose whether the event belongs to the workspace (its name) or is Personal. You only choose this when creating it.
- Fill in the fields.
- Click Save.
Esc or Cancel closes the editor without saving.
Event fields
| Field | Details |
|---|---|
| Where it goes | The event's layer: the workspace (the whole team sees it) or Personal (only you). |
| Title | The event's name. If you leave it empty it's saved as "Untitled". |
| Date | The day of the event. It starts on the day you picked. |
| Start and end time | 09:00–10:00 by default. Hidden when All day is on. An event starts and ends on the same day. |
| All day | The event takes the whole day and has no times. |
| Repeats | Makes the event recurring (see Recurring events). |
| Color | One of the nine calendar tones, with its intensity, or Automatic (see Event colors). |
| Tags | Labels such as Important or Meeting (see Tags). |
| Description (optional) | Free text: agenda, link to the call, notes. |
| Participants | Workspace members involved in the event. Only for workspace events. |
Participants
Click members under Participants to add or remove them. Availability counts the event as busy time for them.
Adding someone as a participant doesn't send them a message or notification.
Event colors
Under Color you pick one of the nine calendar tones: apricot, pistachio, sky, wheat, peony, mint, coral, lavender and Lucía, a soft pink. Lucía is only in the calendar; boards and workspaces have eight. On the Calendar page, an event with a color sits in a box of that color; one on Automatic has no box. In a calendar embedded in a page and in Tylode Calendar, events on Automatic take their calendar's color.
While you type the title of a new event, Tylode suggests a color based on what it says, for example:
| If the title mentions… | Suggested color |
|---|---|
| A birthday, an anniversary, a party or a dinner | Peony |
| An exam, a class or studying | Lavender |
| The gym, a workout or a sport | Pistachio |
| Something urgent, a deadline or a payment | Coral |
| A meeting, a call or an interview | Sky |
| The doctor, the dentist or an appointment | Mint |
| A trip, a flight or a holiday | Apricot |
| Shopping, errands or the house | Wheat |
It's only a suggestion: if you pick another color, or Automatic, your choice stays.
Color intensity
When you pick a tone, its five intensities appear below it, just as the event will look: Very soft, Soft (the usual one), Medium, Strong and Very strong. They help you tell apart events of the same color, for example a subject's classes in Soft and its exams in Very strong. The two strongest switch the text color so it stays easy to read. If you change the tone, the intensity you had stays.
You can also pick the intensity for each calendar's color and in templates. On Home, events show their tone without the intensity, and Lucía ones as peony.
Tags
Tags show at a glance what kind of event it is. Each one has its color, and in the calendar they appear as dots next to the title. In the Home calendar, each day of the month is colored with the tags of what's on it.
When you edit an event, under Tags:
- Click a tag to add or remove it.
- Double-click a tag to rename it. Press Enter to save or Esc to cancel.
- + (Add tag) creates a new one, adds it to the event and lets you type its name. Each new tag gets a color from the palette that isn't in use yet.
There are three to start with: Important, Meeting and Deadline. You can have up to six. The workspace calendar's tags are shared by the whole team: if someone renames one, it changes for everyone. The ones on your personal layer are yours alone.
Event templates
Templates are for things you repeat without a fixed date, such as "Gym" or "Client call". They're in the left column of the Calendar page, on wide screens.
- Under Templates, click + (New template).
- Type the title, choose the Duration (from 15 minutes to 3 hours) and, if you like, a color.
- Click Save.
To use one, drag it onto a day in the Month or Week view. Tylode asks for the Time (09:00 unless you change it) and, if you have more than one calendar, which one it goes in. Click Add and the event is created with the template's title, duration and color.
Templates are yours: they're saved to your account and nobody else sees them. You can have up to 12. To delete one, hover over it and click the ×.
Edit or delete an event
Click the event, change what you need and click Save.
To delete it, click Delete and then click again (Sure? Click again). If you don't have permission, you'll see "You don't have permission to edit this event."
Recurring events
Turn on Repeats to make an event recur.
- Under Every, type a number and pick a unit: day(s), week(s), month(s) or year(s). For example, every 2 week(s).
- For weekly events, click the days of the week it repeats on (for example Monday and Wednesday).
- Under Ends, choose:
- never: repeats with no end date;
- on a date: pick the last date;
- after N times: type how many occurrences (10 by default).
Below the options, a sentence summarizes the rule so you can check it at a glance, for example "Every 2 weeks on M, W, 10 times." or "Every month, with no end date."
All occurrences appear in the calendar with the repeat icon. Changes you save apply to the whole series.
Delete one occurrence or the whole series
When you click Delete on an occurrence of a recurring event, Tylode asks what to delete:
- Only this one removes just that occurrence; the rest of the series stays.
- Whole series deletes every occurrence.
- Cancel keeps everything.
Shared availability
Availability helps you find a time when several people in the workspace are free.
- Open the ⋯ menu in the calendar toolbar and choose Availability.
- Under People, select the members you want to meet with.
- Pick the day.
- Click Find free slots.
You'll see:
- Common free slots (09:00–18:00): the gaps between 09:00 and 18:00 when everyone you selected is free, or "No common free slots that day.";
- Busy times by person: each person's busy intervals, or Free all day.
A person counts as busy during workspace events where they're a participant. Personal events stay private and aren't taken into account.
Booking links
A booking link lets anyone, even without a Tylode account, book a meeting with you in your free time. People who open it only see your free times: never what you have on or when you're busy.
Create a link
- In the calendar's left column, click Booking links (on narrow screens, it's in the ⋯ menu).
- Click New link and fill in:
- Link name, for example "Office hours". This is what people see when booking.
- Where meetings are saved: your personal calendar or the calendar of a workspace where you can create events. Each meeting is created there as a normal event.
- Description (optional).
- Available days: the days of the week that can be booked.
- Time slots: from what time to what time, in 15-minute steps. You can add several per day (for example, 9:00 to 13:00 and 16:00 to 19:00). If you untick Same time slots every day, you choose different slots for each day.
- Maximum length per meeting: in 15-minute steps up to 1 hour, then in half-hour steps up to 8 hours. People choose how long, up to that maximum.
- Under More options you'll find Minimum notice (2 hours by default), how many days ahead people can book (60 by default) and a Buffer between meetings (none by default).
- Click Create link. It's copied automatically; later you can copy it with Copy link. On a phone or tablet, in the browser, Share… appears next to it: it opens your device's share menu so you can send the link through whichever app you like.
From the same list you can Edit a link, Pause it (it stops accepting bookings until you resume it) or Delete it. Meetings already booked stay in your calendar.
What counts as busy
To work out your free times, everything of yours counts, in all your workspaces and your personal calendar: events you created, events where you're a participant and events that come from your Google Calendar if it's connected. Your teammates' events in the workspace calendar don't count. All-day events don't either, as in Google Calendar.
How the other person books
They open the link, choose the length, the day and the time (in their time zone), and enter a Title, their name, their email and, if they want, the reason. The meeting appears in your calendar straight away, with their name, email and reason in the description, and you get a notification. If the calendar is synced with Google, the meeting reaches it too.
The person who booked gets a confirmation email with a link to cancel the meeting. If they cancel, the event disappears from your calendar and you get another notification. To change the time, they cancel and book again.
To prevent abuse, the same email can make at most three bookings a day with each link.
By plan
On Free you can have one booking link; on Pro and Premium, as many as you like. On Premium, the booking page doesn't show "Made with Tylode".
Habits
A habit is a reminder that repeats without taking up your calendar: “Brush my teeth” at 8:00 and 22:00, “Drink water” three times a day, “Check email” on weekdays at 9:00. It isn’t an event, it doesn’t show on the calendar or block time: it just reminds you at the right moment, to help you build the routine.
Habits are yours: nobody else in the workspace can see them.
Create a habit
- In the calendar’s left column, click Habits (on narrower screens, in the ⋯ menu).
- Click New habit and fill in:
- Name, for example “Brush my teeth”. It’s the reminder’s title.
- Group (optional), for example Health, Work or Everyday life, or any group you like. The list groups your habits by it.
- Description (optional): shown under the name in the reminder.
- Days: the days of the week it reminds you. Every day, Weekdays and Weekend select them in one go.
- Times a day and the time for each one. The times are the same on every selected day; for a different weekend schedule, create a second habit.
- Click Save.
From the same list you can Edit a habit, Pause it (it stops reminding you until you resume it) or Delete it.
Where reminders arrive
- In the iPhone app, with Tylode notifications turned on, even if you don’t open it.
- In the desktop app, while it’s open (including in the system tray).
Times use your time zone when you create or edit the habit.
On your plan
On Free you can have up to 3 habits; on Pro and Premium, as many as you like.
Embed the calendar
In a page
Type / in a page and choose Calendar. The workspace calendar appears inside the page as a compact month view, and you can create and open events from there. The other views, Back to today, the legend, the ⋯ menu and New event are only on the full calendar. See Blocks.
In a whiteboard
On a whiteboard, use Insert a Tylode object and choose Calendar. The whiteboard shows a card for the workspace calendar with an Open button.
Your personal layer doesn't appear in an embedded calendar: only the workspace calendar is embedded.
Create events with the assistant
The assistant creates events in the workspace calendar from a plain sentence, for example "tomorrow at 10 review the report" or "on Tuesday call Marta". An event with a time lasts one hour; if you only give a day, it's created as an all-day event. The reply includes a View in calendar link. Each command uses one AI credit.
The calendar on Home
Home has a calendar with the day in large type and what's coming up on the left, and the month on the right, with each day colored by its tags. It combines events from the workspace calendar and your personal calendar with cards that have a due date. In its ⋯ you choose which calendars and boards it shows, and Open calendar brings you here.
Google Calendar sync
Anyone can connect their Google Calendar and keep it in sync both ways with a workspace calendar, including from the iPhone app.
- Go to Settings → Integrations and click Connect Google. Give permission on Google's screen and you'll come back to Tylode. In the desktop and iPhone apps, you connect in the browser and return to the app when you're done.
- Under Sync calendars, find the workspace calendar you want to pair with your main Google Calendar (the calendars of all your workspaces are listed).
- Click Enable next to it.
From then on it syncs on its own, both ways: every 5 minutes and whenever you open the calendar. If you don't want to wait, click Sync now. The result tells you how many events were pulled from Google, sent to Google and deleted, or "Everything was already up to date."
If the same event changes on both sides, the most recent change wins. Disable stops syncing that calendar. Your personal layer isn't synced with Google. See Integrations.
See it in Apple or Outlook
Open the ⋯ menu in the calendar toolbar, choose View the workspace calendar in Apple or Outlook… or View your personal calendar in Apple or Outlook… and click Create link. Each layer has its own link. Tylode creates a private link for you; paste it into your other calendar app (for Google Calendar, use the two-way sync instead):
- Apple: on a Mac, File → New Calendar Subscription; on iPhone, Settings → Calendar → Accounts → Add Account → Other → Add Subscribed Calendar.
- Outlook: Add calendar → Subscribe from web.
The other app sees the events (from 90 days back to a year ahead, including recurring ones, at the right time) but can't change them. It refreshes on its own every few hours: that's up to the other app, not Tylode.
Anyone with the link can see those events, so don't share it. In the same place you can Change the link (the old one stops working) or Turn it off. The link for a workspace calendar is yours: if you leave the workspace, it stops working.
Import a calendar (.ics)
To bring the events from another app over in one go:
- In the other app, export the calendar as an .ics file (in Google Calendar: Settings → Import & export → Export; in Apple Calendar: File → Export; in Outlook: Save calendar).
- In Tylode, open the ⋯ menu in the calendar toolbar and choose Import .ics.
- Press Choose file. You'll see how many events there are and how many repeat.
- If you see more than one calendar, choose where to import them (the workspace one or your personal one) and press Import.
It imports the title, the description and the location (added at the end of the description), times in their time zone, all-day events and recurring ones, without the occurrences that were deleted. Cancelled events are skipped. If you import the same file twice, what was already there isn't duplicated.
It's a copy: whatever you change later in the other app doesn't reach Tylode. For Google Calendar, the two-way sync keeps itself up to date. Up to 5 MB and 5,000 events per file.
What the calendar doesn't do yet
- Reminders are by email, not in-app notifications: turn them on in Settings → Notifications. Tylode Calendar also alerts you 10 minutes before.
- No subscribing from Tylode to calendars from other apps so they keep themselves up to date (you can import them once, and the other way round works: see See it in Apple or Outlook). The exception is Google Calendar, which syncs both ways.
- No invitations or RSVPs: participants aren't notified.
Permissions
- Workspace calendar: everyone in the workspace can see it. Creating, editing and deleting events requires a role that can create and edit content (Member, Admin or Owner, or a custom role with that permission). People with the Read-only role can see events but not change them. In a frozen workspace the calendar is read-only.
- Your personal layer: only you can see and edit it, whatever workspace you're in.
See Members and roles.
Tylode Calendar
If you want the calendar always to hand without the rest of Tylode, use Tylode Calendar: the same calendar in its own app, in the browser or on Windows, with your personal calendar and every workspace's calendar at once and a heads-up 10 minutes before each event. It's free on every plan.
API
With a Pro or Premium plan you can list events (recurring ones expanded into occurrences) and create events in the workspace calendar through the REST API and the MCP server. See Calendar API.